
Animation and game programming go hand and hand, and when using a graphical environment like Windows, users expect animation in games. Before you can provide animation to your game, you need to display a graphic or image.
One method is using a PictureBox control, which is used to display graphics from a bitmap, metafile, icon, JPEG, GIF, or PNG file. The PictureBox class defines a set of properties and methods that are common to the PictureBox control.
Note: Most of the PictureBox class properties, methods, and events are inherited from the Control class.
In this tutorial, we will discuss various methods for adding animation to your game.
Example 1: Animation
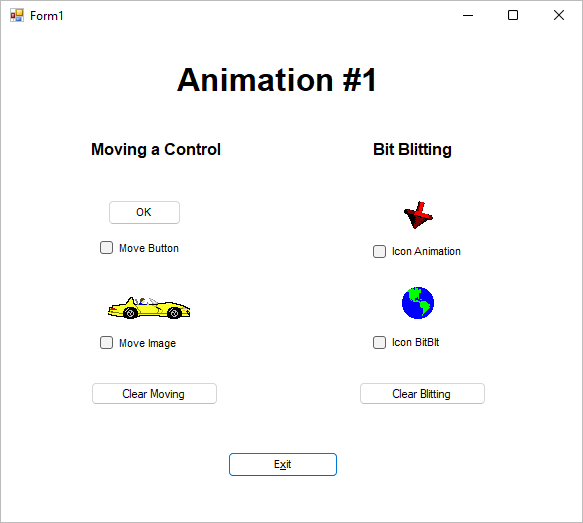
The Animation example (Move.sln) will illustrate moving a control and animate an icon.
Moving a Control
One of the easiest ways to add animation to you game is by moving a control. One way is to change the values of the Left properties. The Left property will get or set the distance, in pixels, between the left edge of the control and the left edge of its container’s client area. If you want to move a button control to the right, use the following code and the button will move 50 units to the right. C# will take care of restoring any underlying graphics (after the button is moved).
//Move the button to the right
btnOk.left = btnOk.left + 50;
Click on the Checkbox under the “Move” button. The Button will move right, removing the check mark in the Checkbox will move the Button left.
Another way is to change the values of the Left and Top properties. If you want to move an image diagonally, use the following code:
//Move the image diagonally
imgCar.left = imgCar.left + 25;
imgCar.Top = imgCar.Top – 25;
Click on the Checkbox under the “Car”. The Car will move diagonally to the right, removing the check mark in the Checkbox will move the Car diagonally left.
Icon Animation
Another way to add animation to your game is to animate an icon. Icons can be animated in several ways. The easiest way is to create several views of an icon and then cycle through them.
You can use the following code to cycle through several views of an icon:
// Update the Top icon number
IconNum = Convert.ToInt16(IconNum + 1);
// Keep the number in range
if (IconNum == MAXICON)
{
IconNum = 0;
}
// Update the icon
switch (IconNum)
{
case 0:
img_Icon.Image = _img_Top_0.Image;
break;
case 1:
img_Icon.Image = _img_Top_1.Image;
break;
case 2:
img_Icon.Image = _img_Top_2.Image;
break;
case 3:
img_Icon.Image = _img_Top_3.Image;
break;
case 4:
img_Icon.Image = _img_Top_4.Image;
break;
case 5:
img_Icon.Image = _img_Top_5.Image;
break;
case 6:
img_Icon.Image = _img_Top_6.Image;
break;
case 7:
img_Icon.Image = _img_Top_7.Image;
break;
}
If you view the source code, you will notice a timer is used to keep the image controls animated?
What is a Timer Control?
The timer is a useful control that enables code to be executed regularly on a predetermined time interval.
When you set the interval property to 100, you are asking the control to run the code in its “Timer” event every 100 Milliseconds.
In this example the Timer event is used to manipulate the image controls to generate the illusion of animation. The Timer control is called tmr_Main, with the interval set at 100.
The following is the code for the tmr_Main_Timer routine:
private void tmr_Main_Tick(object eventSender, System.EventArgs eventArgs)
{
// Update the icon number
IconNum = Convert.ToInt16(IconNum + 1);
// Keep the number in range
if (IconNum == MAXICON)
{
IconNum = 0;
}
// Are we not iconized
if (WindowState != (System.Windows.Forms.FormWindowState)1)
{
// Animate the icon
if (chk_Icon.CheckState == (System.Windows.Forms.CheckState)1)
{
// Update the Top icon
switch (IconNum)
{
case 0:
img_Icon.Image = _img_Top_0.Image;
break;
case 1:
img_Icon.Image = _img_Top_1.Image;
break;
case 2:
img_Icon.Image = _img_Top_2.Image;
break;
case 3:
img_Icon.Image = _img_Top_3.Image;
break;
case 4:
img_Icon.Image = _img_Top_4.Image;
break;
case 5:
img_Icon.Image = _img_Top_5.Image;
break;
case 6:
img_Icon.Image = _img_Top_6.Image;
break;
case 7:
img_Icon.Image = _img_Top_7.Image;
break;
}
}
// Animate the Earth icon
if (chk_IconBlt.CheckState == (System.Windows.Forms.CheckState)1)
{
switch (IconNum)
{
case 0:
pic_Icon.Image = _pic_Earth_0.Image;
break;
case 1:
pic_Icon.Image = _pic_Earth_1.Image;
break;
case 2:
pic_Icon.Image = _pic_Earth_2.Image;
break;
case 3:
pic_Icon.Image = _pic_Earth_3.Image;
break;
case 4:
pic_Icon.Image = _pic_Earth_4.Image;
break;
case 5:
pic_Icon.Image = _pic_Earth_5.Image;
break;
case 6:
pic_Icon.Image = _pic_Earth_6.Image;
break;
case 7:
pic_Icon.Image = _pic_Earth_7.Image;
break;
}
}
}
}
With this method, you can animate an icon in a Picturebox control. With Picturebox controls, you can animate objects larger than the 32×32 icon size by cycling through larger images. Larger images require more program space and can slow the maximum animation speed. The disadvantage to this form of animation is that the images tend to flicker. The flicker occurs because the image is first erased and the new image is displayed.
Reduce Graphics Flicker
Reduce Graphics Flicker with Double Buffering for Forms and Controls. Double buffering uses a memory buffer to address the flicker problems associated with multiple paint operations. When double buffering is enabled, all paint operations are first rendered to a memory buffer instead of the drawing surface on the screen.
Set the DoubleBuffered property to true.
DoubleBuffered = true;
Example 2: Drag and Drop
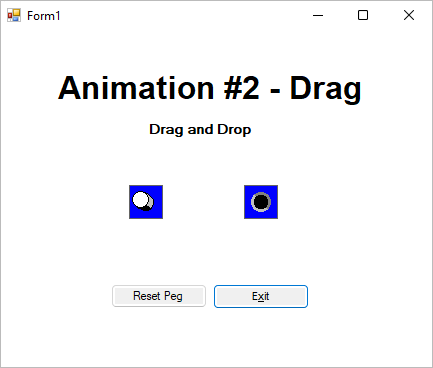
The Drag and Drop example (Drag.sln) will illustrate the use of Drag and Drop operations.
Drag and Drop
The Drag and Drop feature is another animation technique that you can apply to your games. It provides an easy method for a control to be dragged to another control and dropped.
Windows Forms includes a set of methods, events, and classes that implement drag-and-drop behavior.
In this example the DragDrop, DragEnter, DragLeave, DragOver, Givefeedback, and MouseDown events of the PictureBox will be used to perform the drag and drop operations.
There are two categories of drag-and-drop events in a drag and drop operation:
- Events that occur on the current target of the drag-and-drop operation.
- Events that occur on the source of the drag and drop operation.
To perform drag-and-drop operations, you must handle these events. By working with the information available in the event arguments of these events, you can easily facilitate drag-and-drop operations.
Events on the current drop target
The following are the events that occur on the current target of a drag-and-drop operation.
- DragEnter – this event occurs when an object is dragged into the control’s bounds. The handler for this event receives an argument of type DragEventArgs.
- DragOver – this event occurs when an object is dragged while the mouse pointer is within the control’s bounds. The handler for this event receives an argument of type DragEventArgs.
- DragDrop – this event occurs when a drag-and-drop operation is completed. The handler for this event receives an argument of type DragEventArgs.
- DragLeave – this event occurs when an object is dragged out of the control’s bounds. The handler for this event receives an argument of type EventArgs.
The DragEventArgs class provides the location of the mouse pointer, the current state of the mouse buttons and modifier keys of the keyboard, the data being dragged, and DragDropEffects values that specify the operations allowed by the source of the drag event and the target drop effect for the operation.
Events on the drop source
The following are the events that occur on the source of the drag-and-drop operation.
- GiveFeedback – this event occurs during a drag operation. It provides an opportunity to give a visual cue to the user that the drag-and-drop operation is occurring, such as changing the mouse pointer. The handler for this event receives an argument of type GiveFeedbackEventArgs.
- QueryContinueDrag – this event is raised during a drag-and-drop operation and enables the drag source to determine whether the drag-and-drop operation should be canceled. The handler for this event receives an argument of type QueryContinueDragEventArgs.
The QueryContinueDragEventArgs class provides the current state of the mouse buttons and modifier keys of the keyboard, a value specifying whether the ESC key was pressed, and a DragAction value that can be set to specify whether the drag-and-drop operation should continue.
Performing drag-and-drop
Drag-and-drop operations always involve two components, the drag source and the drop target. To start a drag-and-drop operation, designate a control as the source and handle the MouseDown event. In the event handler, call the DoDragDrop method providing the data associated with the drop and the a DragDropEffects value.
Set the target control’s AllowDrop property to true to allow that control to accept a drag-and-drop operation. The target handles two events, first an event in response to the drag being over the control, such as DragOver. And a second event which is the drop action itself, DragDrop.
In this example we want to drag a peg from one hole to the other hole.
To do this we would need 4 image controls, picture boxes. One image control with the peg in the hole and the other one without a peg in the hole. The other two image controls will be holders for the two images.
Open the “Drag” example (Drag.sln), which will illustrate the use of Drag and Drop.
The following shows the img_Drag controls:
_img_Drag_0.image = none, place holder one, for peg or peg hole.
_img_Drag_1.image = none, place holder two, for peg or peg hole.
_img_Drag_2.image = image with peg in hole.
_img_Drag_3.image = image without peg in hole.
When the form is first loaded the two images are placed into the holders as follows:
//Place the drag images
_img_Drag_0.Image = _img_Drag_2.Image;
_img_Drag_1.Image = _img_Drag_3.Image;
_img_Drag_0.AllowDrop() = True;
_img_Drag_1.AllowDrop() = True;
The AllowDrop Property, Gets or sets a value indicating whether the control can accept data that the user drags onto it. If set to True, the drag-and-drop operations are allowed in the control; otherwise, FALSE, the drag-and-drop operations are not allowed. The default is FALSE.
In this case, we want the place holders to accept the peg, so we set then to TRUE.
When you select the image with the peg by pressing the left mouse button, the following code is executed.
private void _img_Drag_0_MouseDown(object sender, MouseEventArgs e)
{
if (_img_Drag_0.Image == _img_Drag_2.Image)
{
//This procedure begins the drag and drop operation using the DoDragDrop method
try
{
//Start drag and drop operations by telling the compiler the application should begin dragging the contained bitmap as a copy operation to the destination control or object
DragDropEffects dde = _img_Drag_0.DoDragDrop(_img_Drag_0.Image, DragDropEffects.Copy);
if (DragDropEffects.None == dde)
{
//Our drag and drop offer not accepted
_img_Drag_0.Image = _img_Drag_2.Image;
}
else
{
//reset cursor to default
Cursor cur = Cursors.WaitCursor;
this.Cursor = cur;
// Do something here
this.Cursor = Cursors.Default;
}
}
catch
{
//Respond to error
MessageBox.Show(“Missing Peg… Try again :-)”, “Reset…”, MessageBoxButtons.OK, MessageBoxIcon.Error, MessageBoxDefaultButton.Button1);
}
}
}
When you leave the image, the image with the peg is replaced with the image without a peg, making it appear as if the peg has disappeared.
private void _img_Drag_0_DragLeave(object sender, EventArgs e)
{
//This procedure erases the image in the current control
// to give the effect of movement
_img_Drag_0.Image = _img_Drag_3.Image;
}
The GiveFeedBack event occurs during a drag operation. It provides an opportunity to give a visual cue to the user that the drag-and-drop operation is occurring, such as changing the mouse pointer. The handler for this event receives an argument of type GiveFeedbackEventArgs.
private void Img_Drag_0_GiveFeedback(object sender, GiveFeedbackEventArgs e)
{
//during drag and drop operation
//set whether drag operation should use the default cursor associated with drag-drop effects. true will use default red circle, false will the custom cursor provided
e.UseDefaultCursors = false;
// Sets the custom cursor based upon the effect.
if ((e.Effect & DragDropEffects.Move) == DragDropEffects.Move)
Cursor.Current = MyNormalCursor;
else
Cursor.Current = MyNoDropCursor;
}
The MyNormalCursor is assigned the default cursor. The MyNoDropCursor is assigned a custom cursor, “andrag3a.cur”, which is the image of the peg.
When the user drags the peg icon to the image of the empty peg hole, the img_Drag_Drag_1_DragEnter routine is called. This procedure verifies whether the destination control can handle the intended data while dragging over. The following is the code for the img_Drag_Drag_1_DragEnter routine:
private void _img_Drag_1_DragEnter(object sender, DragEventArgs e)
{
//Verify that the data format to be copied can be handled by the recipient control.
if (e.Data.GetDataPresent(DataFormats.Bitmap) && (e.AllowedEffect & DragDropEffects.Copy) != 0)
{
e.Effect = DragDropEffects.Copy;
}
else
{
e.Effect = DragDropEffects.None;
}
}
When the user drops the peg icon onto the image of the empty peg hole, the img_Drag_Drag_1_DragDrop routine is called. ‘This procedure receives the dragged data once it passes the data verification handled by the DragEnter method. This procedure copies the “peg in the hole” image to the image control. This gives the illusion that the peg is dropped into the peg hole.
private void _img_Drag_1_DragDrop(object sender, DragEventArgs e)
{
//Drops the data onto the destination control
_img_Drag_1.Image = (System.Drawing.Image)(e.Data.GetData(DataFormats.Bitmap, true));
}
Note: the user can drop the peg into the same hole from which the peg appeared. Also, if the user dropped the peg and was not over a peg hole the peg will return to the source.
You can use the Drag and Drop method for board games, such as Checkers, Chess, Peg Solitaire or any game in which you need to pick up a playing piece and move it to another location.
Example3 : BitBlt

The BitBlt example (BitBlt.sln) will illustrate sprite animation using the Graphics class.
Bit Bliting
BitBlt, an acronym for Bit Block Transfer, is a very fast Windows API routine for transferring a rectangular area of an image to another rectangular area of equal size. This includes copying, combining or merging images and displaying the result.
The term sprite is used to refer to an irregularly shaped graphics object that moves across a complex background.
This example will use the Graphics Class to move the sprite around the form. The Graphics class provides methods for drawing objects to the display device.
//initiate an object for the graphics
private Graphics G;
To display a sprite, you need an image. The image contains the actual sprite object. The following steps display a sprite:
- Create the image on the form.
- Determine where to draw the image. Creating a rectangle structure, where the sprite will be located. This creates a “hole” in the background, which you will fill in with the sprite image.
- Clear the background.
- Display the sprite object. Place the sprite image at the same location as the rectangle using the DrawImage Method.
In order for us to begin using the Graphics.DrawImage method, it is important that we understand it.
This example will use two methods of the Graphics class, the Clear method and DrawImage method.
Clear Method
The Clear method does just that, clears the entire drawing surface and fills it with the specified background color.
public void Clear (color);
Parameters:
color Structure that represents the background color of the drawing surface.
The following code for the Clear method will clear the entire drawing surface and fill it with the color white.
//clear the screen to whatever color you wish
G.Clear(System.Drawing.Color.White);
DrawImage method
The DrawImage Method will draw the specified Image object at the specified location and with the original size.
public void DrawImage (image, destRect, srcX, srcY, srcWidth, srcHeight, srcUnit);
Parameters:
image Image object to draw.
destRect Rectangle structure that specifies the location and size of the drawn image. The image is scaled to fit the rectangle.
srcX x-coordinate of the upper-left corner of the portion of the source image to draw.
srcY y-coordinate of the upper-left corner of the portion of the source image to draw.
srcWidth Width of the portion of the source image to draw.
srcHeight Height of the portion of the source image to draw.
srcUnit Member of the GraphicsUnit enumeration that specifies the units of measure used to determine the source rectangle.
The above destRect is the Rectangle Structure, which stores a set of four integers that represent the location and size of a rectangle.
Rectangle Constructor (x, y, width, height)
Parameters:
x x-coordinate of the upper-left corner of the rectangle.
y y-coordinate of the upper-left corner of the rectangle.
width Width of the rectangle.
height Height of the rectangle.
Next, we will view the code for the Bitblt form. The following variables were added to the form “Form1”.
//initiate an object for the graphics
private Graphics G;
//initiate an object for our bitmap
private Bitmap bmap;
//set a variable to hold the X coord of our sprite in the bitmap
private int BitMapX;
//set a variable to hold the Y coord of our sprite in the bitmap
private int BitMapY;
//set a variable to hold the X coord of our position on the screen
private int MoveX1;
//set a variable to hold the Y coord of our position on the screen
private int MoveY1;
private System.Drawing.Rectangle r;
These variables will be used to detect the X and Y coordinates of the picture when it is moved.
Next, the code was added to the FrmBitblt_Load event. This will initialize the Graphics and locations:
private void frmBitblt_Load(object eventSender, System.EventArgs eventArgs)
{
//assign value to G
G = this.CreateGraphics();
//load our bitmap
bmap = new Bitmap(System.IO.Directory.GetCurrentDirectory() + “\\smile1.bmp”);
//make it transparent
bmap.MakeTransparent(System.Drawing.Color.White);
//initialize the start locations for the drawing rectangle
MoveX1 = 150;
MoveY1 = 100;
BitMapX = 0;
BitMapY = 0;
}
The following is an explanation of each line of code.
- Create a Graphics object for the Control.
- Create a Bitmap object to work with images defined by pixel data.
- Change the Bitmap object‘s color to be transparent. The color white is the form background color.
- Set the variables for the start location of the rectangle. MoveX = 100 and MoveY = 100
The following code was added to the DisplayImage, which will make our BitBlt calls:
private void DisplayImage()
{
//make a rectangle – point on the screen by size and set its values
r = new Rectangle(MoveX, MoveY, 32, 32);
//clear the screen to the forms background color
G.Clear(System.Drawing.Color.White);
//draw our sprite
G.DrawImage(bmap, r, BitMapX, BitMapY, 32, 32, GraphicsUnit.Pixel);
//display X/Y positions
lblMoveX.Text = MoveX.ToString();
lblMoveY.Text = MoveY.ToString();
}
The following is an explanation of each line of code.
- Create a new instance of the Rectangle class with the specified location (MoveX, MoveY) and size (32, 32). MoveX = 100 and MoveY = 100
- Clear the screen to color of black.
- Draw the sprite with the bitmap (smile1.bmp) at the location of the rectangle.
Therefore, a rectangle was created and the bitmap was displayed at the location of the rectangle.
Next, we need to put some code in our form to make the picture move.
Remember those variables we added to the form “Form1”, MoveX and MoveY, we will use these variables to move the sprite. First, we want to designate the starting positions for our picture and refresh the screen. Therefore, we added the following code to the Form_Load() event.
MoveX = 150;
MoveY = 100;
The MoveX and MoveY are variables, which are given values when the user hits the arrow keys, so we need to add some code to the Form_KeyDown () event. We use a Select Case to determine which keys are pressed and what they need to do when pressed.
Below is the entire source code, an explanation of the code will follow:
private void frmBitblt_KeyDown(object eventSender, KeyEventArgs e)
{
//move sprite
short KeyCode = (short)e.KeyCode;
switch (KeyCode)
{
case (short)Keys.Right:
if (MoveX1 < this.Width – 47)
{
MoveX1 += 5;
}
else
{
MoveX1 = this.Width – 47;
}
break;
case (short)Keys.Left:
if (MoveX1 – 5 > 0)
{
MoveX1 -= 5;
}
else
{
MoveX1 = 0;
}
break;
case (short)Keys.Up:
if (MoveY1 – 55 > 0)
{
MoveY1 -= 5;
}
else
{
MoveY1 = 55;
}
break;
case (short)Keys.Down:
if (MoveY1 < this.Height – 165)
{
MoveY1 += 5;
}
}
DisplayImage();
}
In this example we use the KeyCode to determine what key the user pressed. The code should be similar to the KeyBoard tutorial “Controlling Your Game in C#”.
The first case is the Keys.Right. If the user pressed the right arrow-key then the Keys.Right will be the case and the MoveX1 will be the current value of MoveX1 plus 5 units, which the picture will move to the right 5 units.
To prevent the picture from scrolling off the screen we need to determine if the MoveX1 or MoveY1 exceed a certain value. We can determine the width and height of the screen by using the Me.width and Me.height. These values designate the end of the form (screen).
Example, if the user keeps pressing the left arrow key and the picture is going off the left side of the screen, show the picture to stop at the left side of the screen.
If MoveX – 5 < 0 Then MoveX -= 5 Else MoveX = 0
If the user keeps pressing the right arrow key and the picture is going off the right side of the screen, show the picture to stop at the right side of the screen.
If MoveX1 < Me.Width – 47 Then MoveX += 5 Else MoveX = Me.Width – 47
Most games use some form of sprite logic to move the game objects around. In Pac-Man, the little yellow circle with an appetite for dots is a sprite and so are the ghost enemies. That brings us to another important part of game development, being able to detect when two objects (usually sprites) collide.
Example4 : Collide

The collision example (Collide.sln) will illustrate collision detection.
Collision Detection
There are several ways to detect a collision. You can test whether the regions DO NOT overlap or you can test whether any part of region A exists in region B. In most cases, all you need to do is detect the collision. Open the “Collision” example Collide.sln.
Remember the BitBlt example (BitBlt.sln) above this is just a modification of that example. Instead of using one image we use two images, one to move around and one to collide with. To detect when two images have a collision, we added a timer to the form, which will check for detection.
The following function was added to the Timer event.
COLLIDE(ref MoveX1, ref MoveX2, ref MoveY1, ref MoveY2);
Remember these variables; MoveX1, MoveY1, they were used to get the values when the user hit the keys to move the image.
The MoveX1and MoveY1 are used for the coordinates of the first image. The MoveX2 and MoveY2 are used for the coordinates of the second image.
The following function was added to detect when there was a collision:
public short COLLIDE(ref short MoveX1, ref short MoveX2, ref short MoveY1, ref short MoveY2)
{
if (MoveX1 >= MoveX2 – (BoxSize / 2))
{ if (MoveX1 <= MoveX2 + (BoxSize / 2))
{ if (MoveY1 >= MoveY2 – (BoxSize / 2))
{ if (MoveY1 <= MoveY2 + (BoxSize / 2))
{
//If all statements are true, there is a collision
//move image2 to new location
MoveImage();
}
}
}
}
return 0;
}
There are four conditions we need to test and if all four conditions are TRUE, then we have a collision. When the program’s form is first loaded the X and Y coordinates of the two images are set. Following are the values of these coordinates:
X and Y coordinate of first image, which moves the image to the right side of the form.
MoveX1 = 200;
MoveY1 = 125;
X and Y coordinate of second image, which moves the image to the left side of the form.
MoveX2 = 150;
MoveY2 = 125;
The variable BoxSize was added to calculate the collision to be as close as possible without overlapping the images. I used the value of 45; you can change this value and see the difference of when there is a collision.
BoxSize = 45;
The increments for the X and Y coordinates are 5 units. Press F5 to run the program. If you move the right image by pressing the Left arrow key (only) you will notice there is a collision when image one’s coordinates are X = 170 and Y = 125. Table 3.2 will show when there is a collision. There are four conditions and if all four conditions are TRUE, then we have a collision.
Table 3.2 collision values
Image One |
| Image Two |
|
|
|
|
|
X1 | Y1 | X2 | Y2 | Cond1 | Cond2 | Cond3 | Cond4 |
200 | 125 | 150 | 125 | 1 | 0 | 1 | 1 |
195 | 125 | 150 | 125 | 1 | 0 | 1 | 1 |
190 | 125 | 150 | 125 | 1 | 0 | 1 | 1 |
185 | 125 | 150 | 125 | 1 | 0 | 1 | 1 |
180 | 125 | 150 | 125 | 1 | 0 | 1 | 1 |
175 | 125 | 150 | 125 | 1 | 0 | 1 | 1 |
170 | 125 | 150 | 125 | 1 | 1 | 1 | 1 |
165 | 125 | 150 | 125 | 1 | 1 | 1 | 1 |
160 | 125 | 150 | 125 | 1 | 1 | 1 | 1 |
155 | 125 | 150 | 125 | 1 | 1 | 1 | 1 |
150 | 125 | 150 | 125 | 1 | 1 | 1 | 1 |
145 | 125 | 150 | 125 | 1 | 1 | 1 | 1 |
140 | 125 | 150 | 125 | 1 | 1 | 1 | 1 |
135 | 125 | 150 | 125 | 1 | 1 | 1 | 1 |
130 | 125 | 150 | 125 | 1 | 1 | 1 | 1 |
125 | 125 | 150 | 125 | 0 | 1 | 1 | 1 |
Cond1 equals: x1 >= (x2 – 22.5)
Cond2 equals: x1 <= (x2 + 22.5)
Cond3 equals: y1 >= (y2 – 22.5)
Cond4 equals: y1 <= (y2 + 22.5)
One other thing that was added to the program was MoveImage(); this allows the image being collided to be moved to a new location. Doing this you will be able to see when the two images have a collision.
public void MoveImage()
{
//Move image2 to new location
int randomnumX;
int randomnumY;
//code to use random function
Random rnum = new Random();
//generating a random number between 1 and 275
randomnumX = (rnum.Next(1, 275));
//generating a random number between 1 and 250
randomnumY = (rnum.Next(1, 250));
MoveX2 = Convert.ToInt16(randomnumX);
MoveY2 = Convert.ToInt16(randomnumY);
DisplayImage2();
}
Example5 : SpaceInvasion5

The collision example (SpaceInvasion5.sln) will illustrate collision detection using control bounds.
Collision Detection
If a missile is launched at an alien spaceship, you need to know when and if the missile hits anything.
In this example, the PictureBox control is used to display graphics from a bitmap, metafile, icon, JPEG, GIF, or PNG file. The PictureBox class defines a set of properties and methods that are common to the PictureBox control.
Note: Most of the PictureBox class properties, methods, and events are inherited from the Control class.
There is one PictureBox control, named player, already added to the form. The player PictureBox will hold the Spaceship image. The user (player) will be able to move the spaceship image left or right on the form.
The other two PictureBox controls, bullet and spaceinvaders, will be created dynamically through the code.
The goal is to be able to know when the bullet from the spaceship hits one of the aliens (spaceinvaders).
To determine when the bullet hits an alien, we use the “Bound” property of the PictureBox class.
The Bound property will get the distance, in pixels, between the bottom edge of the control and the top edge of its container’s client area.
The Bound property for the PictureBox is inherited from the Control class, which has a property value Rectangle.
The Rectangle is in pixels relative to the parent control that represents the size and location of the control.
The Rectangle Struct stores a set of four integers that represent the location and size of a rectangle. A rectangle is defined by its Width, Height, and upper-left corner represented by the Location property.
Finally, the IntersectsWith(Rectangle) method of the Rectangle Struct is used to determine if one rectangle intersects with the other rectangle.
public readonly bool IntersectsWith (System.Drawing.Rectangle rect);
This method returns true if there is any intersection, otherwise false.
private void InstanceRectangleIntersection(PaintEventArgs e)
{
Rectangle rectangle1 = new Rectangle(50, 50, 200, 100);
Rectangle rectangle2 = new Rectangle(70, 20, 100, 200);
if (rectangle1.IntersectsWith(rectangle2))
{
//increase the score by 1
score += 1;
}
}
To move the spaceship left or right the KeyDown event was used to determine if the left or right arrows were pressed. The KeyDown event was also used to determine if the “X” key was pressed, if the value was true then the spaceship’s weapon was fired and a bullet was launched.
To launch the bullet the function “CreateBullet” was called.
private void CreateBullet(string bulletTag)
{
PictureBox bullet = new PictureBox
{
Image = Properties.Resources.bullet,
BackColor = Color.Black,
Size = new Size(5, 20),
Tag = bulletTag,
Left = player.Left + player.Width / 2
};
//launch Bullet from top of spaceship
if ((string)bullet.Tag == “bullet”)
{
bullet.Top = player.Top – 20;
}
this.Controls.Add(bullet);
bullet.BringToFront();
}
The code is explained below:
- Picture Box bullet = new PictureBox – create a new instance of the Picture Box class.
- Image = Properties.Resources.bullet – the bullet image from the resources is assigned to the bullet image picture box.
- BackColor = Color.Black – set the bullet color to black.
- Size = new Size(5, 20) – set the width and height of the bullet image.
- Tag = bulletTag – set the tag for the bullet as “bullet”, which was sent as a parameter to the function.
- Left = player.Left + player.Width / 2 – when the “X” key is pressed the bullet will appear in middle of the spaceship. The value is determined by calculating the left of the player and the width then divide that by 2.
- Top = player.Top – 20 – we want the bullet image to appear over top of the spaceship.
- Controls.Add(bullet) – add the picture box to the form.
- BringToFront() – bring the image to the front of other objects on the screen.
Next, we need to add the function to create the spaceinvaders dynamically.
private void CreateInvaders()
{
spaceinvadersArray = new PictureBox[numberInvaders];
int left = 0;
for (int i = 0; i < spaceinvadersArray.Length; i++)
{
//spaceinvader or mothership
spaceinvadersArray[i] = new PictureBox
{
Size = new Size(60, 50),
Image = Properties.Resources.spaceinvader,
Top = 5,
Tag = “spaceinvaders”,
Left = left,
SizeMode = PictureBoxSizeMode.StretchImage
};
this.Controls.Add(spaceinvadersArray[i]);
left -= 80;
}
}
The code for this is similar to the code used to add the bullet, but we are using a PictureBox array called spaceinvadersArray, to add multiple aliens.
Animating the bullets and aliens (spaceinvaders)
The timer is a useful control that enables code to be executed regularly on a predetermined time interval.
When you set the interval property to 100, you are asking the control to run the code in its “Timer” event every 100 Milliseconds.
In this example the Timer event is used to manipulate the image controls to generate the illusion of animation. The Timer control is called gameTimer, with the interval set to 20.
The following is the code for the MainGameTimerEvent:
private void MainGameTimerEvent(object sender, EventArgs e)
{
foreach (Control x in this.Controls)
{
//add some code
}
}
The code added to the for loop.
if (x is PictureBox && (string)x.Tag == “spaceinvaders”)
{
x.Left += enemySpeed;
if (x.Left > 730)
{
x.Top += 65;
x.Left = -80;
}
if (x.Bounds.IntersectsWith(player.Bounds))
{
//GameOver(“SpaceInvader Won!”);
}
foreach (Control y in this.Controls)
{
if (y is PictureBox && (string)y.Tag == “bullet”)
{
if (y.Bounds.IntersectsWith(x.Bounds))
{
this.Controls.Remove(x);
this.Controls.Remove(y);
score += 1;
shooting = false;
}
}
}
}
Once the loop starts, the condition of the if statement is checked, the x variable is compared to the tag of the PictureBox. If the picture box is tagged “spaceinvaders”, then the SpaceInvaders PictureBox is moved to the right, x.Left += enemySpeed;
We then check for a collision with the player, if a collision is detected, then the function “GameOver” is called.
The IntersectsWith(Rectangle) method is used to determine if this rectangle intersects with the rectangle to test.
public readonly bool IntersectsWith (System.Drawing.Rectangle rect);
The x.Bounds of the SpaceInvader is compared with the player.Bounds, if they are equal then there is a collision.
Then the y.Bounds of the Bullet is compared with the x.Bounds of the SpaceInvaders, if they are equal then there is a collision and the score is increased.
Next, the bullet image is moved up the form.
if (x is PictureBox && (string)x.Tag == “bullet”)
{
x.Top -= 20;
if (x.Top < 15)
{
this.Controls.Remove(x);
shooting = false;
}
}
To allow the aliens to fire bullets at the spaceship the following code is added.
if (x is PictureBox && (string)x.Tag == “spaceBullet”)
{
x.Top += 20;
if (x.Top > 620)
{
this.Controls.Remove(x);
}
if (x.Bounds.IntersectsWith(player.Bounds))
{
this.Controls.Remove(x);
//GameOver(“SpaceInvader Won!”);
}
}
This code is similar to the code for the bullet, except the bullet moves down the form and the Bounds for the bullet and the player are checked for a collision. If there is a collision the “Game is Over”.
Conclusion:
Now, we can add sound to know when a collision was detected. View our tutorial, “Adding Sound to your game“.