Unity is a game engine that enables you to develop games. This article will show you how to create a new project in Unity.
Open the Unity Hub, you will see the splash screen where the projects are listed.
Click the New Project button to start a new project. Unity will open the new project window.
In the New Project window there are several templates you can choose from for your project. You will be creating a 2D project.
For this project the Editor Version should be 2020.3.26f1 LTS.
Click on Core in the left menu, then select 2D Core under search templates. Next, give your project a name, enter 2D_Sample_Project under project settings.
Click on the Create project button and Unity will open the project template in the editor.
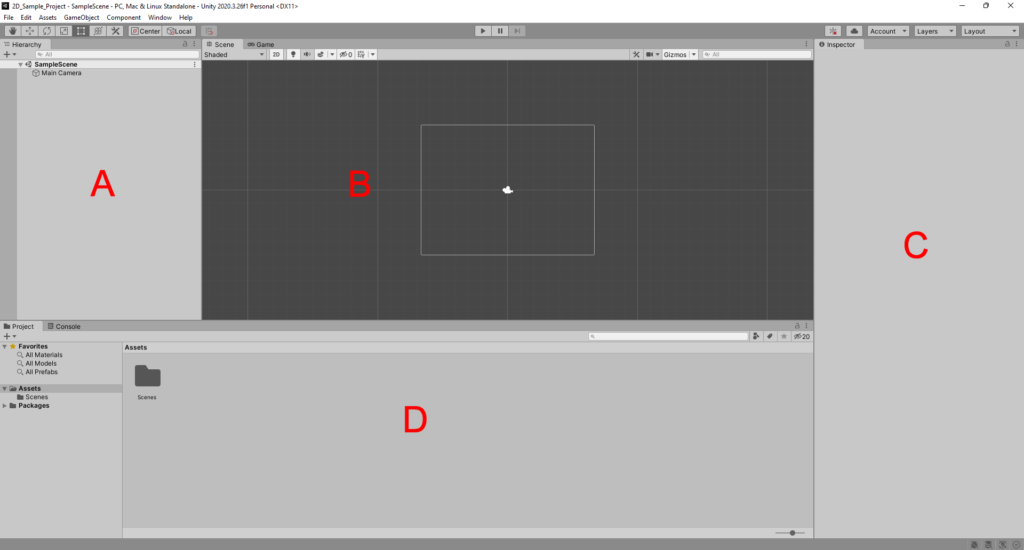
The Unity editor is made up of small individual windows; Hierarchy window, Scene area, Inspector window, and Project Window.
The main Editor features are as follows.
A. Hierarchy window – list all objects that exist in the current Scene.
B. Scene view – main work area, which allows you to have a visual navigation and editing capability for the scene you are creating.
C. Inspector window – list the properties of a selected object or asset.
D. Project window – list all the assets, scenes, and scripts contained in the project.
Additional windows can be found under the Windows drop-down at the top of the work area.
Click on the Main Camera object in the left window, called the Hierarchy window.
You will see the properties for the Main Camera in the Inspector window. Basically, a new project is created, but before you build and run the project, you need a way to close or quit the project.
To close or quit the project, you need to call the Application.Quit() method. To do this you can add a Quit button to the project and attach a script to the button, The script will include the Application.Quit() method.
You can add a button to the scene by clicking on the plus sign on the top-left corner of the Hierarchy window, and selecting UI > Button.
This will add a button to the UI canvas object.
Click on the “Game” tab above the scene window and you will see the button was added to the project.
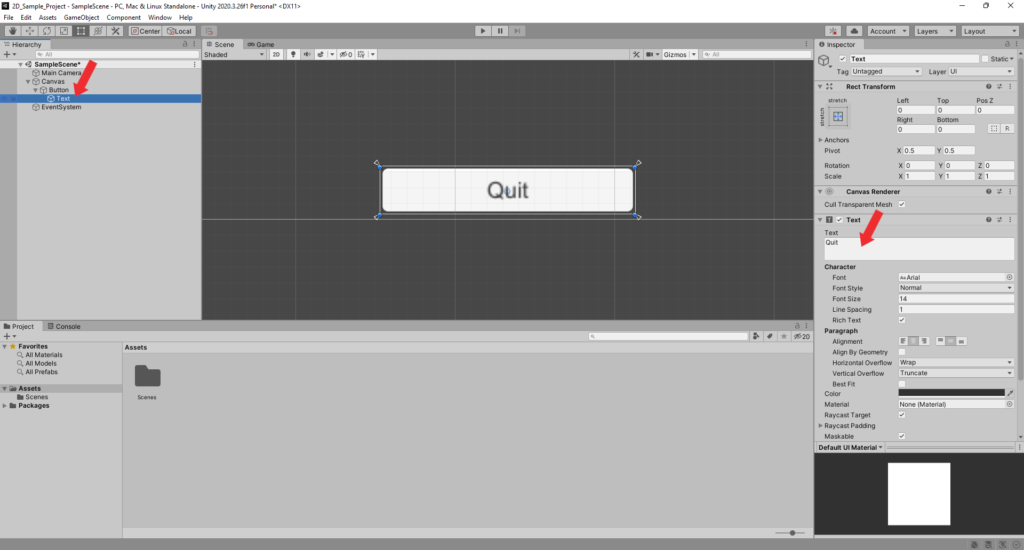
You can change the button’s label by selecting the Text object under the button object and editing the text in the inspector.
Double click on the Button object, then click on the Arrow next to the button object, then click on the Text object to change the name of the button. Type Quit in the text field. Then click on the Button object again.
Next, you need a script to hold the Application.Quit() method to quit the game.
Click on the plus sign at the top-left corner of the Project window and select C# Script or Right-click on the Project window and select Create > C# Script.
Name the script Exit_Script.
Next, double-click on the script to open the code editor. Then modify the script to match the following, then save and exit the code editor.
using System.Collections;
using System.Collections.Generic;
using UnityEngine;
public class Exit_script : MonoBehaviour
{
public void button_exit()
{
Application.Quit();
}
}
Notice the code for the Exit_script now includes the new Application.Quit() method.
The script above will tell the game to quit when the button_exit () method is called. To do this, you need to attach the Exit_script script including the Application.Quit() method to the Quit button.
First, you need to go back to the button object you created earlier, just click on the Button object in the Hierarchy window.
The Inspector window will show the properties for the Quit button. Scroll down the properties to the Add Component button.
You can add the script to the button object by clicking the Add Component button in the inspector.
Click on the Add Component button, scroll down and select Script, then select the script Exit_script.
The Exit_script has been successfully attached to the button.
The On Click () section is where you will add the Application.Quit() method to trigger when the button is clicked.
Click on the + plus sign at the bottom of the section to add an empty On Click event.
Drag the script component Exit_script into the None (Object) box. This will expose the Button component to various methods available inside the script.
Then, click on the No Function drop-down box and select [Your Script’s Class Name] > [Public Method You Want to Call].
In this case, the class is Exit_script and the method is button_exit ().
The result will look something like the image below.
Click on the Game tab to view the Quit button.
Build and Run:
Now you can build and run the project and try clicking on the quit button, the project should close.
From the menu select File, then select Build and Run. The Build window will popup asking you to select the project folder.
Click on the folder 2D_Sample_Project, then click on the Select Folder button. After a few minutes you should see your game with the Quit button.
Click the button and your game should quit or close as intended.
That’s it! You have a game template with ability to quit or close the game whenever you want.